The client wanted to make better use of a tiny bedroom she called the Box Room since it was where the family stored their unused items. She wanted the room to serve as her guest bedroom and have in it a full size bed, while offering storage space for her office paperwork, her husband's oversize tennis bag and her disaster kit backpack. We started by giving away the old single bed and clearing out extraneous items.
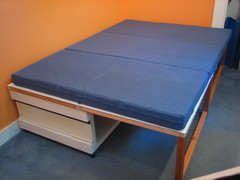
I designed a folding rollaway bed using two doors hinged together with a piano hinge. I built the frame to accomodate storage underneath for the folding foam mattress and bed clothes.
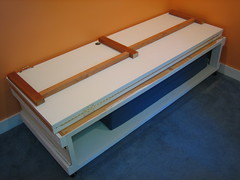
Here is the bed in it's folded configuration. The frame of the storage cabinet was built from salvaged 2 x 4's. For the legs I used wood from an old futon frame. The castors were salvaged from an old metal typing table. Still to be added is the cabinet door.
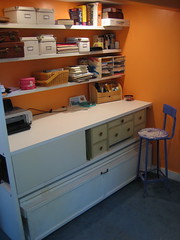
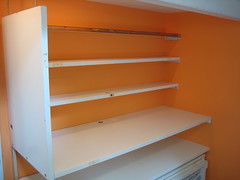
Five hollow core doors went into the project. I found them on Craig's list where doors are often offered for sale. Freecycle is also a good source for doors as well as salvage yards. The end door of the unit is held in place by friction. I installed two bolts into the top of the door which then press into a piece of wood in the ceiling. The three shelves were cut lengthwise from one door and mounted to the wall. The top shelf was open on both sides so I cut a piece of molding to cover it. Then patched all the door hinge cut-outs and lock holes.
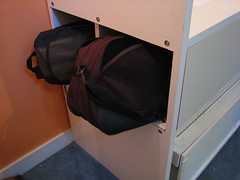
The big tennis bag on the right determined the height of the desk added to the height of the bed in it's folded position. The wall of the desk unit was made from a hollow core door through which I cut openings to fit the bags. The floor and ceiling of the cubbies were completed by the two doors used to make the desk.
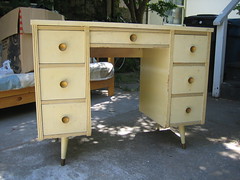
My client wanted lots of drawers which would be very time consuming to make. Luckily that same week, I found this old desk on freecycle. I removed the desktop and cut the carcass to fit between the two doors of the desk unit. The client preferred to leave the drawers the color it was and keep the original knobs.
The key to the success of the project was a great deal of measuring, sketching of layouts and a plan drawing to get all the cuts right for it to fit together as one unit.